Module OLED i2C 128x64 pixels

Description
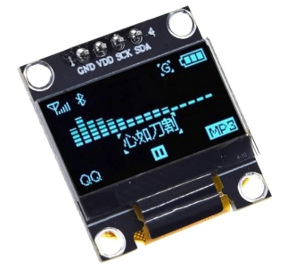
Module OLED monochrome I2C de 128x64 pixels. Dimensions écran réduite 27x15mm (équivalent cadran de montre)
Info
A mon sens, tout l'intérêt d'un afficheur de ce type est d'afficher sous forme graphique une mesure, pas d'afficher du texte simple, ce qui peut être fait sur un simple LCD i2C. Et noter qu'on peut utiliser les 2 simultanément, i2C le permet...
Warning
Existe dans une variante 128x32 à l'identique pour le reste.
Brochage
Module i2c qui comprend :
- broche Vcc : 5V ou 3.3V
- broche GND
- broche SDA
- broche SCL
Caractéristiques :
- Vcc : 5V ou 3.3V
- consommation : 25mA
Montage type :
Utiliser I2C1
Pour une raison inexpliquée, l'afficheur s'est avéré un peu capricieux sur I2C0, ce qui a été rapporté dans divers post. En utilisant i2C1, tout rentre dans l'ordre.
Voir notamment : https://raspberrypi.stackexchange.com/questions/123791/rpi-pico-micropython-ssd1306-oserror-5

Librairie Micropython
Version officielle pour la Pyboard : Lib officielle ici : https://github.com/micropython/micropython/tree/master/drivers/display
Noter que cette librairie repose sur le module Micropython framebuf qui fournit des fonctions de gestion d'images. https://docs.micropython.org/en/latest/library/framebuf.html
Le fichier dont on a besoin ici est le fichier SSD1306.py : https://github.com/micropython/micropython/blob/master/drivers/display/ssd1306.py
A noter version également ici : https://github.com/peterhinch/micropython-nano-gui/tree/master/drivers/ssd1306
On télécharge en ligne de commande avec :
wget https://raw.githubusercontent.com/micropython/micropython/master/drivers/display/ssd1306.py
Copier sur la carte avec :
./copy.sh /dev/ttyACM0 ssd1306.py
Code d'exemple
Je m'inspire du code trouvé ici, excellent pour débuter avec ce petit afficheur :
import machine, ssd1306
i2c = machine.I2C(1,scl=machine.Pin(19), sda=machine.Pin(18)) # port i2C1 sur GP18(sda) et GP19(scl)

oled = ssd1306.SSD1306_I2C(128, 64, i2c, 0x3c)
oled.fill(0)
oled.text("Hello World", 0, 0)
oled.show()
Pour aller plus loin
L'afficheur est un afficheur graphique et par conséquent, il est possible de faire toutes sortes de choses assez facilement.
Ici, un exemple plutôt complet de ce qui est possible : https://www.instructables.com/SSD1306-With-Raspberry-Pi-Pico/
Voici ce code transposé qui explore les différentes possibilités avec le SSD 1306 avec le Pi Pico
from machine import Pin, I2C
import ssd1306

WIDTH=128
HEIGHT=64

i2c = I2C(1,scl=Pin(19), sda=Pin(18)) # port i2C1 sur GP18(sda) et GP19(scl)

#oled = ssd1306.SSD1306_I2C(128, 64, i2c, 0x3c)
oled = ssd1306.SSD1306_I2C(WIDTH, HEIGHT, i2c, 0x3c)


# test
"""
oled.fill(0)
oled.text("Hello world !", 0, 0)
oled.show()
"""

import framebuf
import math
import utime

# Raspberry Pi logo as 32x32 bytearray
buffer = bytearray(b"\x00\x00\x00\x00\x00\x00\x00\x00\x00\x00\x00\x00\x00|?\x00\x01\x86@\x80\x01\x01\x80\x80\x01\x11\x88\x80\x01\x05\xa0\x80\x00\x83\xc1\x00\x00C\xe3\x00\x00~\xfc\x00\x00L'\x00\x00\x9c\x11\x00\x00\xbf\xfd\x00\x00\xe1\x87\x00\x01\xc1\x83\x80\x02A\x82@\x02A\x82@\x02\xc1\xc2@\x02\xf6>\xc0\x01\xfc=\x80\x01\x18\x18\x80\x01\x88\x10\x80\x00\x8c!\x00\x00\x87\xf1\x00\x00\x7f\xf6\x00\x008\x1c\x00\x00\x0c \x00\x00\x03\xc0\x00\x00\x00\x00\x00\x00\x00\x00\x00\x00\x00\x00\x00")

# Load the raspberry pi logo into the framebuffer (the image is 32x32)
fb = framebuf.FrameBuffer(buffer, 32, 32, framebuf.MONO_HLSB)

def blk():
    oled.fill(0)
    oled.show()

def horiz(l,t,r,c):  # left, right , top
    n = r-l+1        # Horizontal line
    for i in range(n):
        oled.pixel(l + i, t, c)

def vert(l,t,b,c):   # left, top, bottom
    n = b-t+1        # Vertical line
    for i in range(n):
        oled.pixel(l, t+i,c)

def box(l,t,r,b,c):  # left, top, right, bottom
    horiz(l,t,r,c)   # Hollow rectangle
    horiz(l,b,r,c)
    vert(l,t,b,c)
    vert(r,t,b,c)

def ring2(cx,cy,r,c):   # Centre (x,y), radius, colour
    for angle in range(0, 90, 2):  # 0 to 90 degrees in 2s
        y3=int(r*math.sin(math.radians(angle)))
        x3=int(r*math.cos(math.radians(angle)))
        oled.pixel(cx-x3,cy+y3,c)  # 4 quadrants
        oled.pixel(cx-x3,cy-y3,c)
        oled.pixel(cx+x3,cy+y3,c)
        oled.pixel(cx+x3,cy-y3,c)

# Clear the oled display in case it has junk on it.
oled.fill(0) # Black

# Blit the image from the framebuffer to the oled display
oled.blit(fb, 96, 0)

# Basic stuff
oled.text("Raspberry Pi",5,5)
oled.text("Pico",5,15)
oled.pixel(10,60,1)
oled.rect(5,32,20,10,1)
oled.fill_rect(40,40,20,10,1)
oled.line(77,45,120,60,1)
oled.rect(75,32,40,10,1)

ring2(50,43,20,1)  # Empty circle
# Finally update the oled display so the image & text is displayed
oled.show()
utime.sleep(3)

# Bouncing Raspberry
oled.fill(0) # Black
dx = 1
dy = 1
x = 13
y = 10
c = 1  # Colour White
for loop in range(250):
    oled.blit(fb, x, y)
    x = x + dx
    y = y + dy
    if (x == 95) or (x == 1):
        dx = dx * -1
    if (y == 31) or (y == 1):
        dy = dy * -1
    box(4,0,123,63,c)
    oled.show()
oled.fill(0) # Black
oled.show()

# Scrolling text on Sine curve
# Modified from a method by Tony DiCola
msg = 'Pico + SSD1306 is Magic!'
f_width  = 8   # Font width in pixels
f_height = 8   # Font Height in pixels
amp = 50   # Amplitude of sin wave
freq = 1    # Screen cycles (360 degrees)
pos = WIDTH  # X position of the first character in the msg.
msg_len_px = len(msg) * f_width  # Pixel width of the msg.
# Extra wide lookup table - calculate once to speed things up
y_table = [0] * (WIDTH+f_width) # 1 character extra
for i in range(len(y_table)):
    p = i / (WIDTH-1)  # Compute current position
    # Create lookup table of  y co-ordinates
    y_table[i] = int(((amp/2.0) * math.sin(2.0*math.pi*freq*p)) + (amp/2.0))

# Main loop:
finish = utime.ticks_ms() + 40000 # 40 seconds
while utime.ticks_ms() < finish:
    # Start again if msg finished
    pos -= 1
    if pos <= -msg_len_px:
        pos = WIDTH
    # Go through each character in the msg.
    blk()
    for i in range(len(msg)):
        char = msg[i]
        char_x = pos + (i * f_width)  # Character's X position on the screen.
        if -f_width <= char_x < WIDTH:
            # If character is visible, draw it.
            oled.text(char, char_x + 5, y_table[char_x + f_width], 1)
    oled.show()
    #utime.sleep(0.08)

# Tidy up
blk()
Et pour aller encore plus loin !
Il existe une librairie graphique en MicroPython, appelée "nano-gui" qui fournit des widgets graphiques minimalistes "clé en main" pour divers écrans. A découvrir ici : https://github.com/peterhinch/micropython-nano-gui#13-quick-start
La mise en oeuvre est plus compliquée mais explorer cette librairie en vaut la peine vu les widgets fournis, etc. Support pour le ssd 1306 disponible à priori.
Liens utiles
Où acheter ?
Module 128x62
- https://www.vs-elec.fr/fr/affichages/744-module-d-affichage-oled-jaune-bleu-096-pouces-128x64-iic-spi-pour-arduino-3665662001719.html
- https://www.gotronic.fr/art-afficheur-oled-0-96-i2c-tf052-28511.htm
Module 128x32
Truc bon à savoir
Il est possible de modifier l'adresse par défaut du OLED (utile pour utiliser plusieurs OLED simultanément :
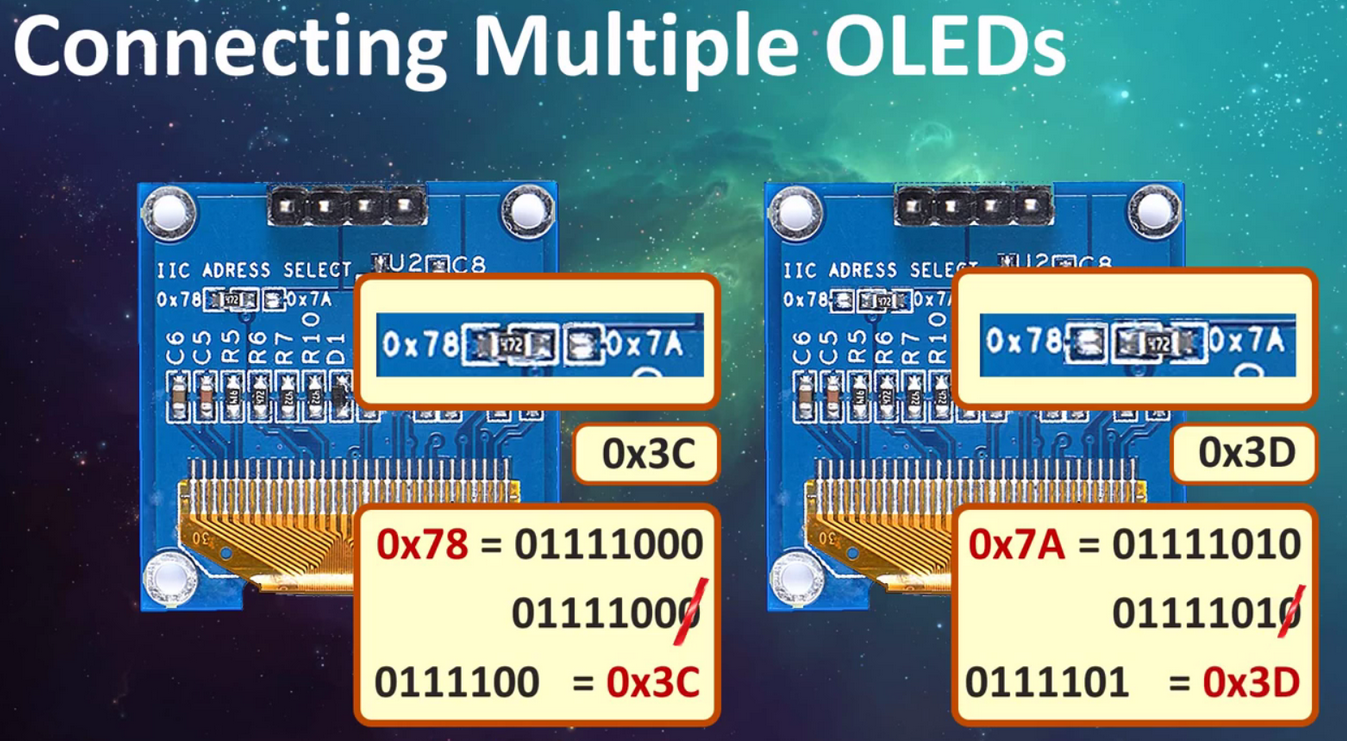
Vu ici : https://maker.pro/arduino/projects/oled-i2c-display-arduinonodemcu-tutorial
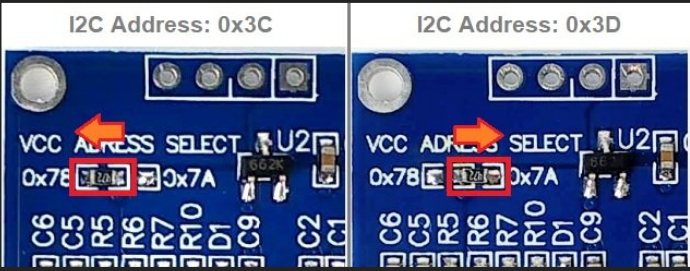
Et là : https://www.cytron.io/p-oled-i2c-0.96inch-128x64-blue-display